On this page
Instruction: Change of selection promptly shifts the focus to a matching heading further down, on the same page.
Welcome
Explore the tools and resources you need to manage your group retirement plan on the secure sponsor site. Learn how to perform your most common tasks with simple, step-by-step instructions and handle all your duties with ease.
Navigation path
The navigation path allows you to access key information such as transactions, functions, and support. Your main navigation offers all your key features organized in categories, with drop-downs that make it easy to find what you’re looking for. You’ll find everything you can do on the site under these categories:
- Transactions—Perform your most-used functions like enrolling members, submitting contributions and terminations, and sending us a file
- Administration—See plan details, manage plan access, and get invoices and statements
- Reports—Get standard or custom reports and check out your interactive dashboards
- Investments—Review everything to do with your plan’s investments, including account values, unit values, and more
- Resources—Find forms, governance guidelines, service reports, and ideas to educate your members and get them engaged in your group savings plan.
- Bulletin board—get the latest news you need to know about your plan
We’ve also added a short description to each feature so you know what to expect.
Easy access from any device
Because we know you’re not always at your desk, the pages are responsive to work on your desktop and your mobile device so you can enjoy the same great experience.
We’re committed to providing an accessible and efficient digital experience so you can quickly take care of the tasks that are important to you.
How to guides
Want to see how to submit contributions, how to enrol or terminate members, and how to manage banking information? Check out these resources.
Enrol a member
Before you begin
Before enrolling a member, ensure the employee is eligible to join the plan.
- When enrolling many employees:
Contact your client relationship manager or client account representative to book an enrolment meeting for your employees. - When enrolling one employee:
Provide the employee with a member kit that includes an enrolment and fund selection guide.
If your plan allows, you can also provide them with your eEnrolment URL. Look for the “Join Now Hub Flyer” or “Onboarding Centre Flyer” in your Bulletin Board.
Only your employees can use the member online enrolment site. - When you need to enrol a member yourself:
If you're ready to submit a contribution for a member who is not yet enrolled in Manulife's administrative system, use the “Enrol a Member” feature on the Plan sponsor secure site.
As the plan administrator, you can enrol a member and/or a spousal member by using the online “Enrol a Member” feature under Transactions. To complete the enrolment process for the member(s), you’ll need the following information:- First and last name
- Date of birth
- Social Insurance Number (SIN)
- Home address
Member enrolment methods
Using your company's policy number and access code, your employees can access a secure enrolment site to provide personal information, designate a beneficiary, and select investments. Your policy number and access code will be included in the enrolment guide. Your employees will become active on Manulife's administrative system immediately after they enrol online. You don't need to do anything.
Note: If you have multiple group savings plans, or plan groups within one plan, a different access code may be set up for each plan or plan group. Provide members with the policy number and access code for all plans or the specific plan group they're eligible to join.
Download a copy of the generic Manulife form.
Spousal RRSPs: Members must complete spousal enrolments by paper.
- Member information
Enrolment form
Select the first option if you already have a completed paper form that has been signed by the member. You’ll need to send it to Manulife for audit and recordkeeping purposes.
Select the second option if you don’t have a signed enrolment form. We will send an Enrolment action form to the member’s postal address.
Enrolment type
You’ll only see this section if your plan allows for spousal accounts.
Select Member if the person you’re enrolling has a direct relantionship with your company or organization.
Select Spousal member if the person you are enrolling doesn’t have a relationship with your company or organization, but their spouse does.
Member information
Add their identification information.
The Service start date is the date they started working for your company or when their relationship with your organization started.
The Plan entry date is when their membership with your group retirement plan became effective. It cannot be prior to their service start date. Some plans allow for immediate eligibility in which case both dates would be identical, others require a waiting period. Please refer to your plan rules for more details on eligibility requirements.
Contributor information
You’ll only see this section if your plan allows for spousal members.
Only complete this section if you’re enrolling a spousal member.
Enter the identification details for the member of your plan.
This information is used to create a link between the member of your plan (the contributor) and their spouse’s account.
- Contact information
Add their mailing address and other contact information.
- Beneficiary instructions
If you know who your members intend to have as their beneficiaries, add their details here.
You may skip this step by clicking on the “No beneficiary instructions” button at the top of the page if you don’t know the members’ choice or if they require more than five beneficiaries.
Note: All beneficiaries added on this page will be set as “revocable” by default. The member may change it to “irrevocable” on the enrolment action form or on the Member website.
- Investment directions
You may skip this step by clicking on the “No member directions” button at the top of the page if you don’t know the members' investment drections.
Members may be allowed to choose how they want to invest contributions. If they’re allowed to make that decision for a given category of contributions, they’re said to have discretion over it.
This page enables you to choose if the investment direction instructions you’ll provide on the next page will apply similarly to all categories the member has discretion over, or if you want to make different investment choices for each of the categories.
- Investment instructions
You’re presented with the list of all the funds available for your member to invest in.
You may click on the funds to get more details about each of them.
Indicate the percentage of their contributions that should be allocated to each fund. For funds that aren’t chosen, leave the field blank.
The total of the percentages must equal 100%. You will get a notification message at the top of the screen if the total is less than or greater than 100%.
- Validate and submit
This page gives you a summary of all the information you provided.
Clicking on the title of each section will take you back to that section and allow you to make corrections if need be.
You may print this page using the default print feature of your browser or use the standard key combinations (Ctrl+P on Windows or Command+P on Macs) to view a print-friendly page.
When you are satisfied with the information on screen, click the Submit button to complete the enrolment process.
You’re done!
Additional information
If your plan allows spousal RRSP enrolments
To set up a spousal account, the employee must be enrolled as a member and also as a contributor. The spouse must be enrolled as a spousal member. When enrolling a spousal member using the Enrol a member function, make sure you indicate this in the enrolment type area on the first screen.
Important to note for RRSP and TFSA: Each member must complete a member enrolment—either paper enrolment form or online. The enrolments are required to meet regulatory registration requirements and to establish and administer the plan member's account.
This optional feature allows you to review enrolments completed online by the employees.
Employee enrolments are held in a pending status until you go online to approve or decline the enrolment. You can view some details for each employee's online enrolment. If an employee has specified an incorrect plan entry date, employment start date, or member number, you can correct the information online before accepting the enrolment.
If you're interested in using the e-enrolment review feature, contact your client relationship manager or client account representative.
If you don't want to sign each member's paper enrolment form before sending it to Manulife, instruct members to submit the form directly to Manulife.
Please note that a plan administrator signature is required on enrolment forms for Registered Pension Plans and Deferred Profit-Sharing Plans.
If you do want to sign each member's paper enrolment form before sending it to Manulife, instruct members to submit the completed form to you, sign the form, and mail it to Manulife.
Manage banking
Things to note before you begin
- Only one bank can be active at a time. The following steps will terminate any existing banking information and immediately create a new bank record.
- If more than one account is required, please reach out to your Manulife representative, and this will be processed manually.
- Bank accounts can be set up at the plan or the plan group level (based on what level is accessed after signing in to the site).
Manage banking—step by step
Sign in to a policy or plan group.
Go to Administration, then select Plan changes
Select Add/change banking information.
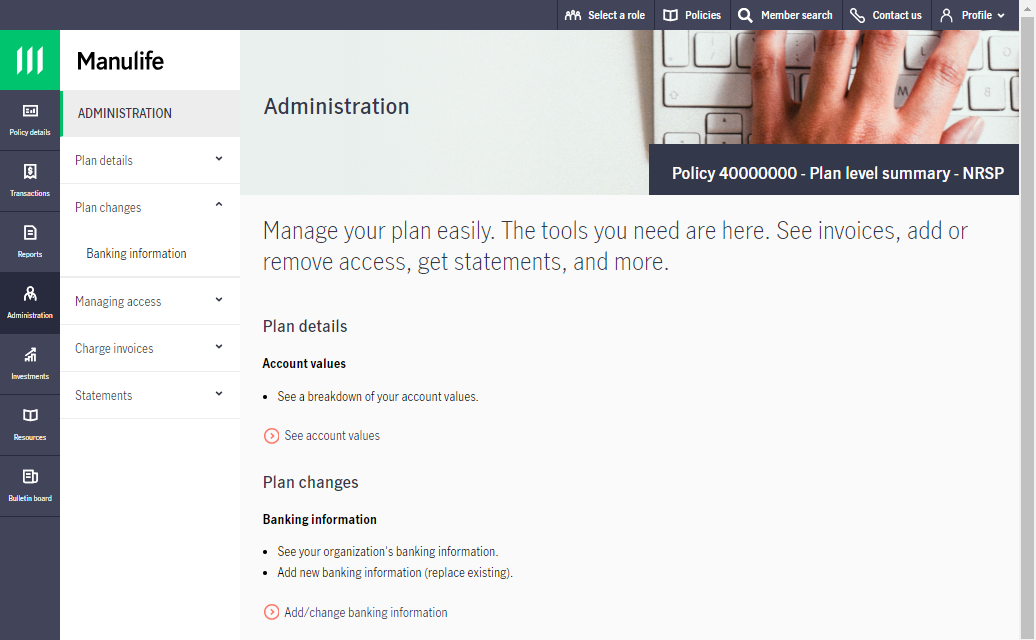
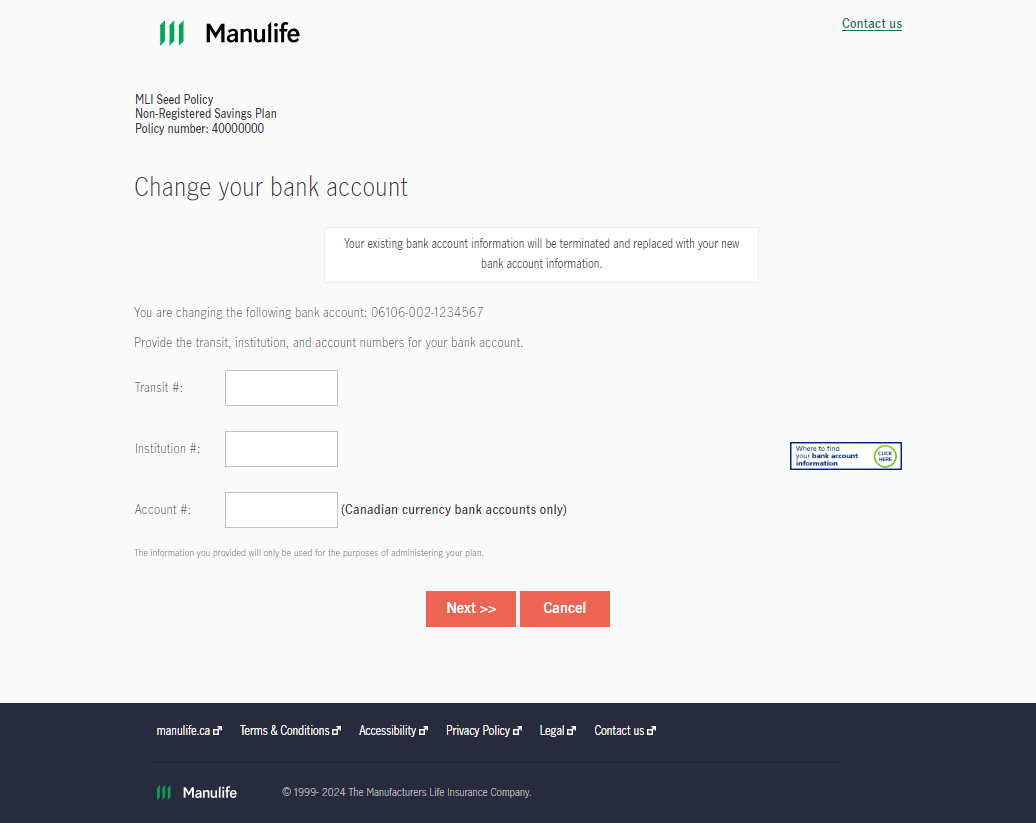
Enter your transit #, institution #, and account #.
Select Next. If there is already bank information on record, this will replace it.
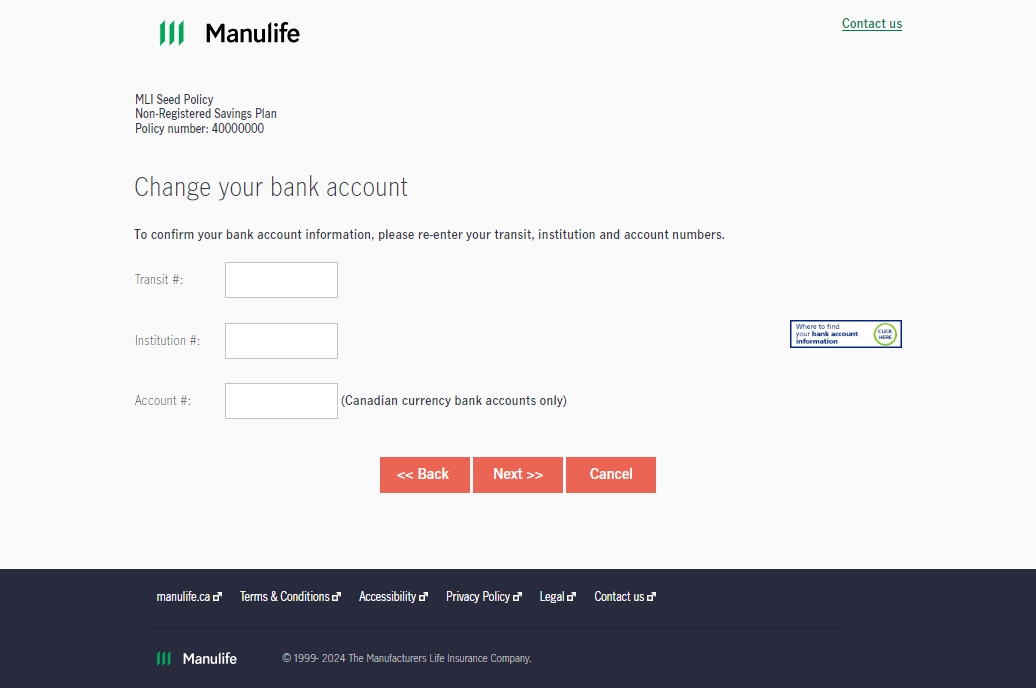
Confirm bank account information.
Reenter transit #, institution # and account #.
Select Next.
Authorize the bank change.
Review the bank information.
Read and accept the authorization.
Select Confirm.
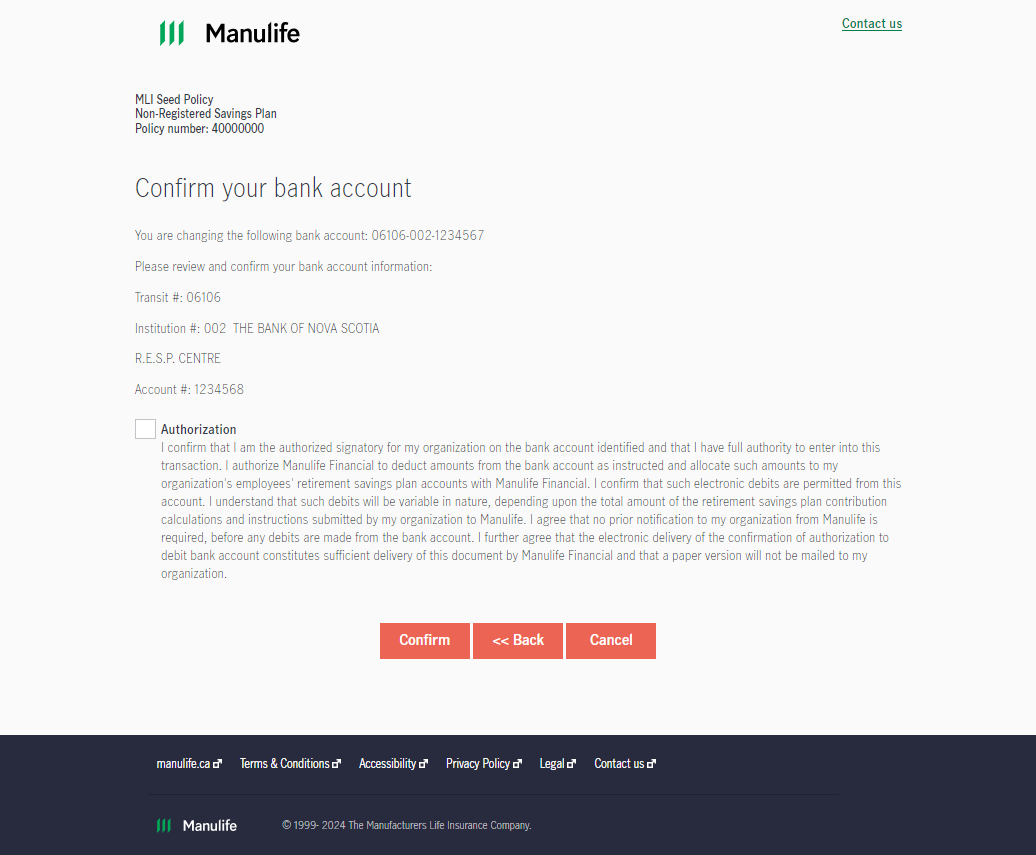
This completes the banking change.
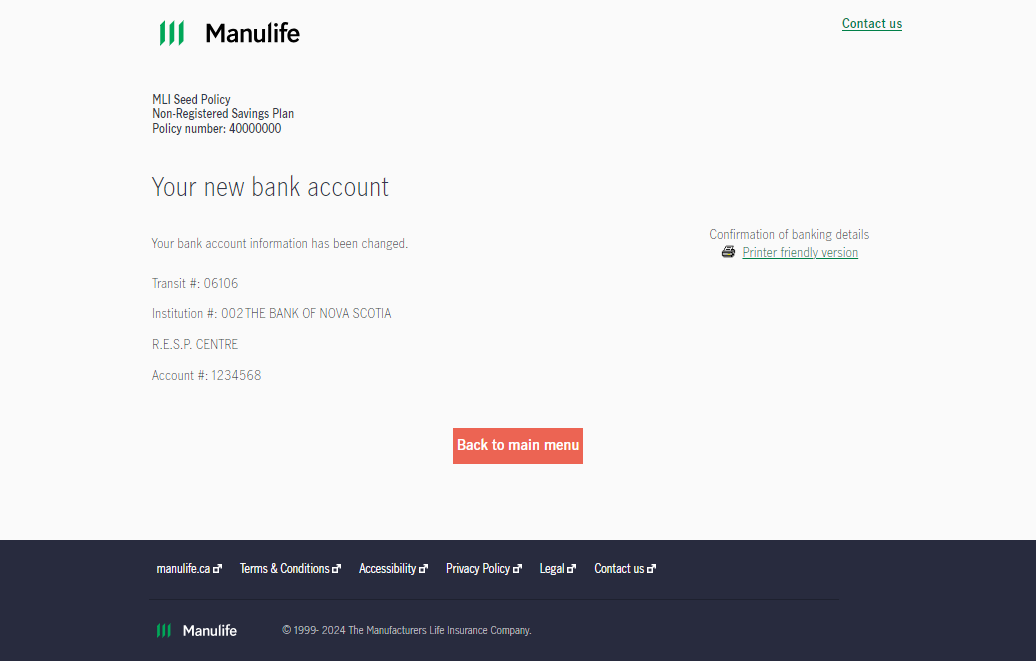
An option will appear to print a confirmation of the banking update.
Submit a contribution listing
Before you begin
To submit contributions for members of the plan, all members must first be enrolled in the plan. If you have contributions for members who haven’t yet enrolled, please use our Enrol a Member feature.
If your plan has over 100 members, it may be more efficient to use our Submit a contribution file instead.
Tips: Submit a contribution listing and Submit a contribution file are connected. You may use a contribution file for your first contribution and the amounts will automatically be updated for you in the contribution listing, giving you a head start for the next period.
Follow our step-by-step guide
- Select Transactions and choose Submit a Contribution listing. All employees who are active members of the plan are listed.
This list also includes members that have been terminated but have yet to receive their final contribution. - Specify the contribution period (i.e., the pay period start and end date that the contributions apply to). The From date is optional, but the To date is mandatory as it’s used in other processes, such as Member terminations.
- Enter the contribution amounts, separating the employee and employer contributions (if applicable), for each employee. Click Continue.
- Review your contribution summary to ensure the correct amounts are in the appropriate contribution categories.
Select a payment method. Sponsor accounts–Variance and forfeiture amounts (if applicable) may be used to reduce your contribution payment unless your plan rules indicate otherwise. For your convenience, you can also pay any billed charges owing (if applicable) with your contribution payment. Click Continue. - Verify the amounts entered and make any corrections, then select Submit.
- Make note of the reference number provided in the confirmation message you receive.
You may print this page using the default print feature of your browser or use the standard key combinations (Ctrl+P on Windows or Command+P on Macs) to view a print-friendly page.
Note: The next time you submit a contribution, your contribution listing will be pre-filled with the previous contribution period’s amount. You’ll only need to update amounts that have changed.
Sponsor accounts: Variance and forfeiture amounts (if applicable) may be used to reduce your contribution payment unless your plan rules indicate otherwise. Ask your client account representative if you have questions about this.
Paying invoiced amounts: For your convenience, you can also pay any billed charges owing (if applicable) with your contribution payment. If paying by wire transfer, email payment details to your client account representative.
Submit a contribution file
Before you begin
To submit contributions for members, all members must first be enrolled in the plan. If you have contributions for members who haven’t yet enrolled, please use our Enrol a Member feature.
Follow our step-by-step guide
- Prepare the contribution file using Manulife’s template.
Plan name: ABC Company of Canada Ltd. (optional)
Division name:
Policy number: 81234001
Total amount being contributed: 2629.98
Contribution period end date YYYYMMMDD: 2024Jun17
Payment by pre-authorized debit: 2629.98
Payment by wire transfer:
Payment by variance account:
Payment by forfeiture:
| Member number | Member last name | Member first name | Member required | Sponsor required | Member voluntary | Sponsor voluntary |
|---|---|---|---|---|---|---|
| 31 | Doe | John | 176.38 | 176.38 | 50.00 | 25.00 |
| 49 | Wong | Jane | 75.80 | 75.80 | 25.00 | 20.00 |
| 113 | Johns | Mike | 263.01 | 263.01 | 75.00 | 50.00 |
| 57 | Cohen | Mary | 103.39 | 103.39 | 50.00 | 25.00 |
| 34 | MacDonald | Marg | 104.40 | 104.40 | 50.00 | 25.00 |
| 55 | Smith | Fred | 150.55 | 150.55 | 75.00 | 50.00 |
| 108 | Myer | Sam | 85.25 | 85.25 | 25.00 | 20.00 |
| 99 | Singh | Diane | 56.21 | 56.21 | 20.00 | 15.00 |
| Total | 1014.99 | 1014.99 | 370.00 | 230.00 |
Without changing the file format or layout, enter the member's name, contribution amounts, and contribution period end date.
Save the completed file to a preferred location as a .txt file. When you save a file as a text document, it assigns a .txt extension. Be sure you save the file to a location that you can easily access next time.
Here are some tips for smooth and accurate processing.
Topic |
Tip |
|---|---|
Names |
First and last name should appear in separate columns without commas or spaces before or after the name. Hyphens may be entered only as part of the member's first or last name. For example: Smith-Bamey. |
Contribution period ending date |
Period ending date for this contribution using YYYYMMMDD format (no spaces). |
Characters not accepted in the file |
|
Spousal contributions |
If the spousal split service has been activated on your plan, contributions for spousal members must be submitted under the contributing member’s number and name. Otherwise, the contributions must be submitted under the recipient member's number and name, not the contributing member's number and name. |
Total |
Totals are allowed but the word "Total" must be in the Member Number column, as shown on the sample spreadsheet. |
Decimal places |
Always enter dollar amounts to two decimal places. For example: 54.45. |
Negative contributions |
Do not include negative contribution amounts and comments in your file. Contact your client account representative for any adjustments to be made to a member's account. |
Copy and paste |
You can copy and paste information from your own file format or from a payroll provider's format to transfer the information to the preformatted file format. |
Multiple plans |
If you have multiple plans, create a separate file for each type of group savings plan you have with Manulife. For example, if you have both an RPP and group RRSP, then you must submit two separate files. |
- Submit your contribution file
- Once your file is ready, select Transactions and choose Submit Contribution file.
- Specify the contribution period.
This corresponds to the period during which the contributions you’re sending have been collected. The starting date is optional, but the ending date is mandatory as it is used in other processes, such as member terminations. - You may drag and drop the file you prepared or browse your computer and find the contribution file you want to upload to Manulife.
- Click Continue.
- Once your file is ready, select Transactions and choose Submit Contribution file.
- If errors are found, they’ll be shown to you at this step
You’ll be able to correct your file and upload it again.
The most common errors are:
- Missing member: Validate their name and member number. You may confirm if their record exists in our systems by searching for them in the Member search at the top of the main screen or requesting a report such as the Member Download.
- Incorrect member number: Validate that no unsupported characters (such as #, $ or space) are included.
- Review your contribution summary to ensure the correct amounts are in the appropriate contribution categories.
- Select a payment method from the drop-down list available. Sponsor accounts–Variance and forfeiture amounts (if applicable) may be used to reduce your contribution payment unless your plan rules indicate otherwise. For your convenience, you can also pay any billed charges owing (if applicable) with your contribution payment.
- Click Continue.
- Select a payment method from the drop-down list available. Sponsor accounts–Variance and forfeiture amounts (if applicable) may be used to reduce your contribution payment unless your plan rules indicate otherwise. For your convenience, you can also pay any billed charges owing (if applicable) with your contribution payment.
- Before you submit the contribution for processing, you’ll see a summary of your contribution details. Verify the information and make any corrections. Click Submit.
- Make note of the reference number provided in the confirmation message you receive.
You may print this page using the default print feature of your browser or use the standard key combinations (Ctrl+P on Windows or Command+P on Macs) to view a print-friendly page.
The bonus contribution feature is designed for occasional contributions to be allocated to a member's accounts (such as an annual company bonus).
If you’re remitting a bonus contribution for members, include the contribution amounts in a separate contribution file or contribution listing. Select the bonus contribution indicator on the screen when you specify the contribution period.
When bonus contribution has been indicated, all contributions in the submission will be processed as "Bonus."
Additional information
The Canada Revenue Agency (CRA) has contribution limits for the following plan types:
- Registered Pension Plan (RPP)
- Deferred Profit-Sharing Plan (DPSP)
- Registered Retirement Savings Plan (RRSP), and
- Tax-free savings account (TFSA)
Refer to the Summary of maximum contributions and benefits on the CAP governance section of the Legislation Corner for the respective annual contribution limits. Keep legislated limits in mind when deducting and submitting contributions for your members.
The maximum amount members can contribute to their group RRSP depends whether the member:
- reported earnings in the prior tax year
- has a pension adjustment
- has carry forward RRSP contribution room from prior years, and
- has individual RRSPs to which they are also contributing
Provincial registered pension plan legislation requires that contributions be remitted to the plan within a specific timeframe. Generally, contributions must be remitted within 15 to 30 days of when the deduction is made. To ensure you are remitting on time, please refer to the Summary of Pension Legislation on the Legislation Corner. For all other tax types, contributions must be remitted in a timely manner.
Terminate a member
Before you begin
Manulife must be advised if members leave the plan for any of these reasons:
- Termination of employment
- Retirement
- Death
- A decision to no longer participate in the plan, if permitted under the rules of the plan
It's important that Manulife receives the member's final contribution in a timely manner so all savings can be processed at the same time. Once all benefits have been withdrawn, the member's status changes to “terminated.” You’ll be unable to submit contributions for a terminated member and will need to contact a client account representative for assistance.
Notify Manulife
In most cases, there are two ways to advise Manulife of a member termination.
Note: Termination requests will be held as pending until all required information is received.
When advising Manulife of a member termination, please specify if there are any related members in the plan (for example, RRSP spousal members).
- Find the member to terminate
In the Terminations section under Transactions, select Terminate a member.
You may search for the member to terminate using their last name or member number.
Click on the last name of the member to terminate to go to the next step.
- Termination reason
Depending on your plan(s) you may see different termination reasons. Select the one that applies.
Please note: Termination for a deceased member cannot be performed online. A paper submission, outlined in When A Member Dies, must be completed.
Key the member’s termination date. This date should be their last day of employment, or the day they chose to no longer participate in your plan(s).
Select the plans to terminate the member. For each of them, please indicate the last contribution details. The period ending date corresponds to the end date of the last contribution period they should be receiving a contribution for.
(i.e., if the member terminates on May 5 and the contributions are paid twice a month, then the period end date would be May 15).
- Contact information
Validate and update the member’s contact information.
Depending on your plan rules, we’ll send termination documentation to that mailing address.
- Validate and submit
This page gives you a summary of all the information you provided.
You may make corrections to each section if need be.
Click on the Submit button once you are ready.
- You’re done!
We will initiate the member's termination process immediately. It may take a few days for the processing to be completed.
You may use the link at the top of the page to view a printer-friendly summary of the termination you submitted.
- Include the Termination Form in the member's termination package. Ask the member to complete, sign, and return the form to you.
- Once you receive the completed form, verify the accuracy of the information.
- Mail the Termination Form to Manulife at the address noted on the form.
Additional information
These default settlement processes are available to specific plan types. Members who terminate from the plan will follow these processes unless otherwise specified in the plan rules.
RRSP/TFSA: Automatically transferred to the Manulife Personal Plan. Plan member will receive a letter confirming the new account set up on their behalf.
RPP: An options statement is issued and assets remain in the plan until the member makes an election.
DPSP: An options statement is issued. If the member doesn’t make an election in 90 days and currently holds or previously held an RRSP account with Manulife, then assets are transferred to the Manulife Personal Plan. If not, assets are cashed out.
NRSP: An options statement is issued. If the member doesn’t make an election in 90 days, assets are transferred to the Manulife Personal Plan.
EPSP: An options statement is issued. If the member doesn’t make an election in 90 days, assets are transferred to the Manulife Personal Plan.
Note: For all plan types (unless the your plan rules indicate otherwise), if a member has less than $1,000 in their account upon termination, the savings will automatically be cashed out. The member will receive the proceeds minus any fees and withholding tax, if applicable.
What is the Manulife Personal PlanTM
The Manulife Personal Plan is primarily a group plan for former members of employer/association-sponsored group savings plans. Members can generally transfer assets to the Manulife Personal Plan without disrupting any of their investments and enjoy many of the same services available through their employer/association-sponsored group savings plans. Members also have the option of transferring additional savings from other plans to consolidate their holdings.
Transition solutions
Leaving a group savings plan can be an intimidating process for members,. To help plan members make the transition from a group savings plan, Manulife's transition solutions team is available to assist them in assessing their options. PlanRight® transition consultants will make direct calls to members who may benefit from additional support. All plan members will be given the toll-free number to contact consultants with questions about the options available.
Member retirement
The steps to process retiring members are the same as for terminating members. A termination of employment form is required.
Retirement listing
To alert you (and your plan advisor, if applicable), when members are nearing retirement age, a retirement listing report is included in your quarterly statement.
The Manulife Group Retirement Income Plan
Available to retiring group savings plan members, Manulife's Group Retirement Income Plan can be an easy, convenient option that lets members turn their savings into retirement income.
With a minimum balance of $5,000, members can move to the Manulife Group Retirement Income Plan free of charge. Unless your plan rules indicate otherwise, members can generally transfer assets to the Manulife Group Retirement Income Plan without disrupting any of their investments and enjoy many of the same services available through their employer/association-sponsored group savings plans.
Members also have the option of transferring additional savings from other plans to consolidate their holdings.
Registered Retirement Income Fund (RRIF)
A RRIF is a registered income product purchased with registered funds from a non-locked-in source. Each year, beginning the year after the RRIF is opened, members must start receiving the minimum amount of income as determined by the CRA. This minimum generally depends on the value of the RRIF at the start of the year and on the member's age. There is no legislated annual maximum withdrawal amount.
Life Income Fund (LIF, RLIF, LRIF, PRIF)
A LIF is a registered income product purchased with registered funds from a locked-in source. Each year, beginning the year after the LIF is opened, members must start receiving the minimum amount of income as determined by the CRA. This minimum generally depends on the value of the LIF at the start of the year and on the member's age. There is legislated annual maximum withdrawal amount.
In some jurisdictions, members must purchase an annuity with remaining LIF funds at age 80.
Annuity
A life annuity is an equal periodic amount paid to individuals for their lifetime. Individuals may select a guaranteed period. A joint and survivor life annuity is an equal periodic amount paid to the individual for their lifetime and the lifetime of their spouse/common law partner. There are a number of choices available to add a guaranteed period. A term certain annuity is an equal periodic amount paid to an individual for a fixed period.
When a member dies, provide the beneficiary with a notice of death form to complete. The form is available in the secure sponsor site. Under Transactions, select Terminate a member and you’ll find a link to the Notice of Death form.
Once you've received the completed notice of death form, sign it and send it to Manulife.
If the beneficiary contacts Manulife directly, Manulife will email or fax the notice of death form directly to the individual to complete. Manulife will require the plan administrator's signature on the form in order to process the death benefit.
When money is paid out in cash to a beneficiary, income tax is typically withheld at the applicable tax withholding rate.
Depending on the value of the member's account, these requirements apply to the process of paying a death benefit:
Benefit values and options
For death benefit amounts up to $100,000:
One of the following documents is required and a copy may be submitted (rather than an original):
- Death certificate
- Funeral director's statement
- Attending physician's statement
- Hospital Proof of Death
- Coroner’s Report
- Parish burial certificate (Quebec only)
For death benefits between $100,000 and including $1,000,000:
One of the following is required, and a certified true copy must be submitted:
- Death certificate
- Funeral director's statement
- Attending physician's statement
- Parish burial certificate (Quebec only)
For death benefits greater than $1,000,000:
Two of the following documents are required, and original documents must be submitted:
- Death certificate
- Attending physician's statement
- Parish burial certificate (Quebec only)
Manulife will accept a certified true copy of a funeral director's statement. A certified true copy is a photocopy of the original that has been seen and signed by the plan sponsor or a notary public.
Once Manulife receives the completed notice of death and the required supporting documents, plan assets will be disbursed as requested by the beneficiary.
